วันพุธที่ 18 พฤศจิกายน พ.ศ. 2558

วัดและบันทึก ค่าความเข้มแสงด้วย Raspberry Pi + BH1750

วัดและบันทึก ค่าความเข้มแสงด้วย Raspberry Pi + BH1750 

    คุณสมบัติ อีกอย่างนึงของ Raspberry Pi คือ สามารถติดต่อกับอุปกรณ์ผ่าน Bus i2c ได้ โดยวันนี้ผมจะลองนำ Raspberry Pi2 Model B ติดต่อกับเซ็นเซอร์วัดความเข้มแสง BH1750 เพื่อวัดความเข้มแสงที่ได้ พร้อมกับบันทึกข้อมูลที่ได้เป็นไฟล์ text
     อุปกรณ์ที่ต้องใช้ ได้แก่ Raspberry Pi และ BH1750 ต่อวงจรดังรูป


     เนื่องจาก BH1750 ใช้การติดต่อผ่าน Bus i2c เมื่อนำมาเชื่อมต่อกับ Raspberry Pi ต้องใช้ภาษา Python ในการเขียนโปรแกรม และต้องมีการติดตั้ง Libraryดังนี้


$ sudo apt-get install python3-smbus
$ sudo apt-get install i2c-tools
$ sudo reboot

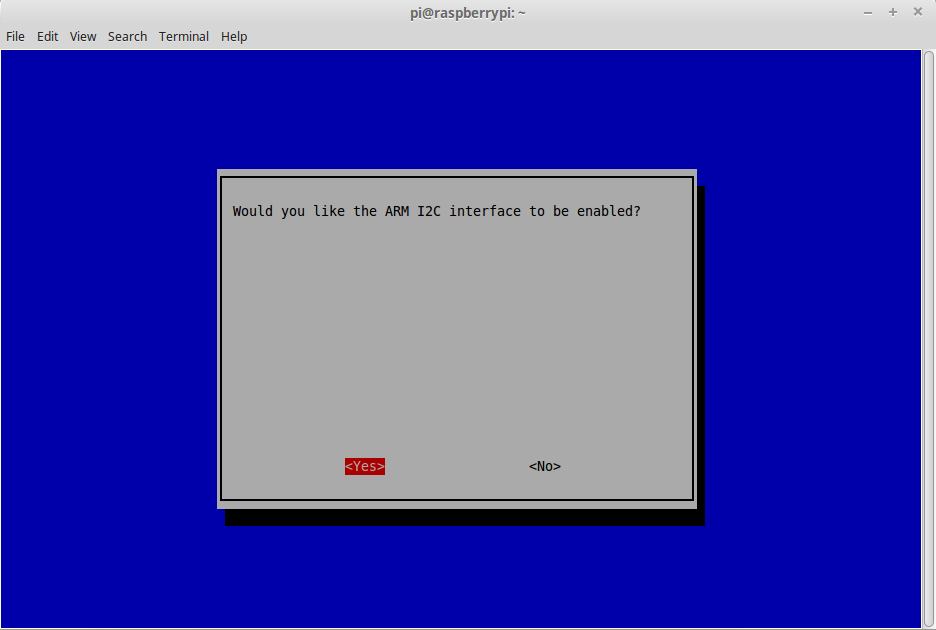
     เมื่อ Reboot เครื่องแล้ว ให้ Enable Bus i2c ของ Raspberry Pi ด้วยคำสั่ง


$ sudo raspi-config

     จะปรากฎหน้าต่าง Raspberry Pi Software Configuration Tools ขึ้นมา จากนั้น เลือก Advance Option >> I2C >> Yes >> OK ดังรูป


        เมื่อต่อวงจร และเปิดใช้งาน Bus I2C แล้ว ตรวจสอบการเชื่อมต่อ Bus i2C ด้วยคำสั่ง


$ sudo i2cdetect -y 1

       หน้าจอจะแสดง การเชื่อมต่อของ Bus i2C ดังรูป (จากรูปอยู่ตำแหน่งที่ 23)


         จากนั้น เขียน Script Python เพื่อวัดค่าความเข้มแสง ดังตัวอย่าง


         Run Program เพื่อทดสอบ 


         เมื่อวัดความเข้มแสงได้แล้ว ต่อไปจะเป็นการเขียนโปรแกรม เพื่อเก็บบันค่าความเข้มแสงที่วัดได้ ลงไฟล์ text


         จากโปรแกรม เป็นการรับค่าความเข้มแสง จาก BH1750 ผ่าน Bus i2C แล้วเก็บบันทึกค่าที่ได้ พร้อมกับ วันและเวลา ลงบนไฟล์ BH1750.txt ทุก 0.5 วินาที เก็บไว้ใน /home/pi/BH1750.txt
         ทดสอบโดยการ Run Program ทิ้งไว้ แล้วเปิดไฟล์ BH1750.txt เพื่อดูว่าข้อมูลถูกบันทึกหรือไม่ ถ้าโปรแกรมทำงานถูกต้อง ไฟล์จะทำการบันทึกข้อมูล ดังรูป


*********************************************************************************
 Montien Ngamkaew 
*********************************************************************************

วันอาทิตย์ที่ 15 พฤศจิกายน พ.ศ. 2558

วิธีตรวจสอบ Public IP บน Raspberry Pi ด้วย Command Line

      การที่เราจะ Remote Raspberry Pi จากภายนอก (ที่ไม่ใช่วง Lan เดียวกัน) จำเป็นจะต้องรู้ IP จริง หรือ Public IP ซึ่งเราจะทราบ Public IP ของ Raspberry Pi ได้นั้น มีอยู่ 2 วิธี ด้วยกัน คือ

      วิธีที่ 1 ดูผ่าน Web Browser โดยเข้าไปที่ www.whatismyip.com หรือ เว็บไซต์เช็ค IP อื่นๆ


   ส่วนวิธีที่ 2 ที่เราจะพูดถึงในวันนี้ คือ การดู Public IP ผ่าน Terminal หรือ Command Line โดยใช้คำสั่ง

$ curl echoip.com 

   เลข IP จริง จะปรากฏขึ้นมา ดังรูป


    จากภาพ IP จริง คือ 180.183.249.171

      จากนั้น ให้เรา Forward Port ที่ Router เมื่อ Forward Port แล้ว ก็สามารถ Remote เข้ามาจัดการกับ Raspberry Pi ได้ตามต้องการ

***********************************************************************************
 Montien Ngamkaew 
***********************************************************************************
 

วันเสาร์ที่ 7 พฤศจิกายน พ.ศ. 2558

การใช้ Raspberry Pi + DHT11 วัดค่าอุณหภูมิ และความชื้น


      เนื่องจาก Raspberry Pi มีขา GPIO สำหรับเชื่อมต่อกับ Hardware ต่างๆ จึงทำให้ Raspberry Pi มีความสามารถเหมือน Microcontroller โดยตัวอย่างนี้ จะเป็นการนำ Raspberry Pi  2 มาวัดหาอุณหภูมิ และความชื้น โดยใช้เซ็นเซอร์วัดอุณหภูมิ DHT11

     1) ก่อนอื่น ต้องติดตั้ง Library ของ DHT11 สำหรับ Python โดย Download จาก Github

$ git clone https://github.com/adafruit/Adafruit_Python_DHT.git

     2) จากนั้น เข้าไปที่ Folder Adafruit_Python_DHT

$ cd Adafruit_Python_DHT

     3) ติดตั้ง Library

$ sudo apt-get update
$ sudo apt-get install build-essential python-dev python-openssl
$ sudo python setup.py install

     4) เมื่อติดตั้ง Library เสร็จแล้ว ทีนี้เราจะมาทดลองวัดอุณหภูมิและความชื้น กัน โดยต่อวงจรดังรูป


DHT11 Raspberry Pi
VCC 3.3 V
GND GND
Output GPIO8

    5) เขียนโปรแกรม ตามตัวอย่าง ดังนี้

#!/usr/bin/python
import sys
import Adafruit_DHT
humidity, temperature = Adafruit_DHT.read_retry(11, 8)
while True: 
     if humidity is not None and temperature is not None:
          print 'Temp={0:0.1f}*C  Humidity={1:0.1f}%'.format(temperature, humidity)
     else:
          print 'Failed to get reading. Try again!'

     6) Run Program เพื่อทดสอบ


     เราก็จะได้ ค่าอุณหภูมิ กับความชื้น ซึ่งค่าที่ได้สามารถนำไป เก็บบนฐานข้อมูล แสดงผล ประมวลผล หรือควบคุม Hardware อื่น ได้ต่อไป


***********************************************************************************
 Montien Ngamkaew 
***********************************************************************************

วันศุกร์ที่ 6 พฤศจิกายน พ.ศ. 2558

วิธี Config Raspberry Pi ให้ใช้ได้กับตัวแปลง HTMI to VGA

      เนื่องจาก Raspberry Pi 2 Model B เหลือเพียง Port HDMI สำหรับต่อ Monitor เท่านั้น สำหรับใครที่มีจอ Monitor ที่ยังใช้ VGA อยู่ แต่อยากนำมาต่อกับ Raspberry Pi จึงจำเป็นต้องมี Adapter (ตัวแปลง) HDMI to VGA ซึ่งบางคนเมื่อนำมาต่อแล้ว ก็ยังไม่สามารถใช้งานได้ เพราะต้องมีการแก้ไข ไฟล์ Config ก่อน
Adapter HDMI to VGA

      โดยวิธีการตั้งค่า เพื่อให้ Adapter HTMI to VGA ใช้งานได้กับ Raspberry Pi มีวิธีการดังนี้

           1) นำ SD Card ติดตั้ง ระบบปฏิบัติการ Raspbian แล้ว มาเสียบกับคอมพิวเตอร์ แล้วเปิดไฟล์ config.txt หรือ Remote เข้าไปแก้ไขด้วยคำสั่ง sudo nano /boot/config.txt เมื่อเปิดไฟล์มาจะได้ ดังรูป


# For more options and information see
# http://www.raspberrypi.org/documentation/configuration/config-txt.md
# Some settings may impact device functionality. See link above for details

# uncomment if you get no picture on HDMI for a default "safe" mode
#hdmi_safe=1

# uncomment this if your display has a black border of unused pixels visible
# and your display can output without overscan
#disable_overscan=1

# uncomment the following to adjust overscan. Use positive numbers if console
# goes off screen, and negative if there is too much border
#overscan_left=16
#overscan_right=16
#overscan_top=16
#overscan_bottom=16

# uncomment to force a console size. By default it will be display's size minus
# overscan.
#framebuffer_width=1280
#framebuffer_height=720

# uncomment if hdmi display is not detected and composite is being output
#hdmi_force_hotplug=1

# uncomment to force a specific HDMI mode (this will force VGA)
#hdmi_group=1
#hdmi_mode=1

# uncomment to force a HDMI mode rather than DVI. This can make audio work in
# DMT (computer monitor) modes
#hdmi_drive=2

# uncomment to increase signal to HDMI, if you have interference, blanking, or
# no display
#config_hdmi_boost=4

# uncomment for composite PAL
#sdtv_mode=2

#uncomment to overclock the arm. 700 MHz is the default.
#arm_freq=800

# Uncomment some or all of these to enable the optional hardware interfaces
#dtparam=i2c_arm=on
#dtparam=i2s=on
#dtparam=spi=on

# Uncomment this to enable the lirc-rpi module
#dtoverlay=lirc-rpi

# Additional overlays and parameters are documented /boot/overlays/README

# Enable audio (loads snd_bcm2835)
dtparam=audio=on

           2) จากนั้นให้แก้ไข ไฟล์ ตามตัวอย่าง


# For more options and information see
# http://www.raspberrypi.org/documentation/configuration/config-txt.md
# Some settings may impact device functionality. See link above for details

# uncomment if you get no picture on HDMI for a default "safe" mode
#hdmi_safe=1

# uncomment this if your display has a black border of unused pixels visible
# and your display can output without overscan
#disable_overscan=1

# uncomment the following to adjust overscan. Use positive numbers if console
# goes off screen, and negative if there is too much border
#overscan_left=16
#overscan_right=16
#overscan_top=16
#overscan_bottom=16

# uncomment to force a console size. By default it will be display's size minus
# overscan.
#framebuffer_width=1280
#framebuffer_height=720

# uncomment if hdmi display is not detected and composite is being output
hdmi_force_hotplug=1

# uncomment to force a specific HDMI mode (this will force VGA)
hdmi_group=2
hdmi_mode=16

# uncomment to force a HDMI mode rather than DVI. This can make audio work in
# DMT (computer monitor) modes
hdmi_drive=2

# uncomment to increase signal to HDMI, if you have interference, blanking, or
# no display
#config_hdmi_boost=4

# uncomment for composite PAL
#sdtv_mode=2

#uncomment to overclock the arm. 700 MHz is the default.
#arm_freq=800

# Uncomment some or all of these to enable the optional hardware interfaces
#dtparam=i2c_arm=on
#dtparam=i2s=on
#dtparam=spi=on

# Uncomment this to enable the lirc-rpi module
#dtoverlay=lirc-rpi

# Additional overlays and parameters are documented /boot/overlays/README

# Enable audio (loads snd_bcm2835)
dtparam=audio=on

      3) นำ SD Card ไปเสียบกับ Raspberry Pi แล้วเปิดใช้งานได้เลย

       เพียงเท่านี้ท่านก็จะสามารถ ต่อ Raspberri y Pi กับ จอ Monitor แบบ VGA ได้แล้วครับ

*********************************************************************************
 Montien Ngamkaew 
*********************************************************************************

วันพุธที่ 4 พฤศจิกายน พ.ศ. 2558

การเชื่อมต่อ WiFi บน Raspberry Pi ผ่าน Command Line


        ในการเชื่อมต่อ Wi-fi บน Raspberry Pi นั้น ไม่ใช่เรื่องยากเย็นอะไร สำหรับมือใหม่ เนื่องจากระบบปฏิบัติการ Raspbian มี GUI Mode สำหรับเชื่อมต่อ WiFi ไว้อยู่แล้ว แต่บางครั้ง ที่เราอาจไม่สะดวกในการเชื่อมต่อ Wi-fi ผ่าน GUI Mode จึงจำเป็นจะต้องเชื่อมต่อ Wi-Fi ผ่านทาง Command Line หรือ Terminal


     ซึ่งวิธีการเชื่อต่อ Wi-Fi ผ่าน Command Line หรือ Terminal มีขั้นตอน ดังต่อไปนี้

      1) ตรวจสอบ Wi-Fi USB หรือ Dongle ด้วย คำสั่ง lsusb


         จากภาพจะเห็นว่า Wi-Fi Dongle ของผู้เขียน คือ Device 004 : Realtek Semiconductor Corp.


      2) จากนั้น Scan หาเครือข่าย Wi-Fi ด้วยคำสั่ง sudo iwlist wlan0 scan


    ถ้าเจอ Wi-fi ให้เชื่อต่อ จะปรากฎดังรูป สังเกตุชื่อ Wi-fi ที่ ESSID
   

      3) เชื่อมต่อ Wi-fi โดยเข้าไปแก้ไขไฟล์  wpa-supplicant.conf ด้วยคำสั่ง sudo nano /etc/wpa-supplicant/wpa-supplicant.conf แล้วเพิ่ม Code ดังภาพ

 
               ssid="ใส่ชื่อ Wifi"
               psk="ใส่รหัสผ่าน"

       จากนั้น บันทึก แล้ว สั่ง Reboot

    4) เมื่อเปิดเครื่องขึ้นมา ตรวจสอบการเชื่อมต่อ Wi-fi ด้วยคำสั่ง ifconfig


        ให้สังเกตที่ wlan0 จะเห็นว่าบรรทัดที่ 2 ตรงคำว่า inet addr จะมี IP Address อยู่ นั่นก็หมายความว่าสามารถเชื่อมต่อ WiFi ได้แล้ว และนั่นก็คือ IP Address ของ Raspberry Pi นั่นเอง

        ในกรณีที่เชื่อมต่อไม่ได้ก็จะไม่มี inet addr แสดงให้เห็น ให้ตรวจสอบการตั้งค่า SSID และรหัสผ่านใหม่อีกครั้ง รวมไปถึงตรวจสอบด้วยว่าตัวปล่อยสัญญาณ WiFi นั้นอยู่ในระยะที่เชื่อมต่อได้หรือไม่

        การตรวจสอบการเชื่อมต่ออินเตอร์เน็ตสามารถทำได้ง่ายๆด้วยการลอง Ping สัญญาณไปที่ Google โดยพิมพ์คำสั่ง ping www.google.com


        ก็จะเห็นข้อความที่ส่งกลับมารวมไปถึงระยะเวลาของการ Ping สัญญาณด้วย เพียงเท่านี้ก็สามารถใช้งานอินเตอร์เน็ตบน Raspberry Pi ได้แล้ว


***********************************************************************************
 Montien Ngamkaew 
***********************************************************************************

วันอังคารที่ 3 พฤศจิกายน พ.ศ. 2558

วิธีตั้งค่า ให้ Raspberry Pi Run Python Script อัตโนมัติ เมื่อเปิดเครื่อง

วิธีตั้งค่า ให้ Raspberry Pi Run Python Script อัตโนมัติ เมื่อเปิดเครื่อง


          เมื่อเราเขียนโปรแกรม หรือ Script อะไรสักอย่าง บน Raspberry Pi สำเร็จ แล้วต้องการให้ Raspberry Pi Run โปรแกรมนั้นเอง อัตโนมัติ เมื่อเปิดเครื่อง สามารถทำได้ ดังนี้

        1) เตรียม Script (จากตัวอย่าง ผมสร้าง Script ที่ชื่อ profile.py เก็บไว้ใน /home/pi/start)

        2) ตั้งค่าเพื่อให้ Raspberry Pi Run Script เมื่อเปิดเครื่อง โดยใช้คำสั่ง


$ sudo nano /etc/profile

        3) จะปรากฎ Text Editor ขึ้นมา ให้แก้ไข โดยการ นำคำสั่งในการ Run script (ตัวอย่าง : sudo python /home/pi/start/profile.py) ไปต่อบรรทัดสุดท้าย ดังรูป


        4) Reboot เครื่อง


          Raspberry Pi ก็จะ ทำการ Run Script ของเราขึ้นมาอัตโนมัติ หรือตัวอย่าง ใครที่เขียนโปรแกรมไฟกระพริบ เมื่อ Reboot เครื่อง โปรแกรมไฟกระพริบ ก็จะเริ่มทำงานทันที นอกจากนี้ยังสามารถ Run พร้อมกันได้หลายโปรแกรม อีกด้วย..........


*********************************************************************
Montien  Ngamkaew
*********************************************************************